Tapping into the inner child. I love painting this way....."singing my song...."
Monday, July 23, 2012
Saturday, January 14, 2012
Earthbag Building - The tests
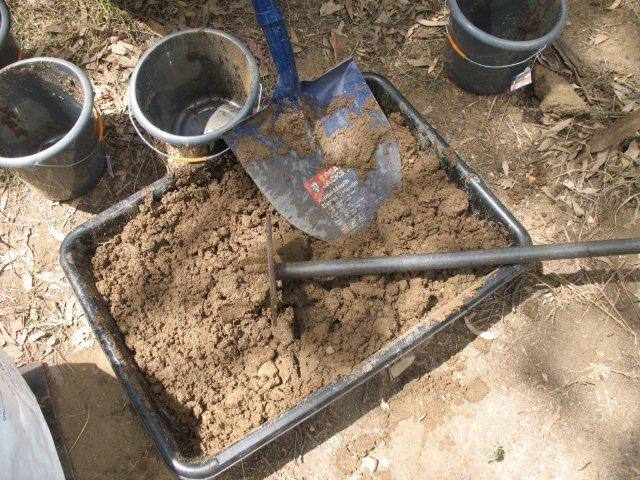
I have a dream of building my own earthbag studio. After hours of research I decided I liked the look of Owen Geiger's Earthbag Round House. and purchased his Earthbag Building Guide.
But did I have the right kind of soil. The goal was to use only recycled materials and keep costs to a minimum. Owen has plans for a $300 earthbag house and I want to do even better. It will be a challenge, but I'll give it my best shot.
Step 1. To test the soil at the Gum Tree Garden.
  |
| First I had to dig some earth to test. This area was heaped up 2 years ago when I had a drive way pushed. I was hoping for some clay in the soil and judging by this hard brick size lump (top photo) I may have just what I need. I shoveled a small amount into a kitchen colander to remove some of the vegetable matter before trying a sample. |
 |
| The samples felt firm and seemed to hold together well. |
 |
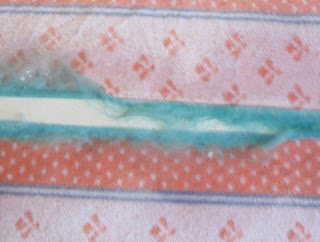
| The samples here were : Top right lumps dug out of the heap. Middle right sample had extra water added and was rolled between the palms. It's been left to dry to see how much it will crack. The lower right is the sample from the picture above after the "drop" test. It seems to have held well. Now to try a bag. |
 |
| Some of the bags collected from Freecycle members, Facebook "Things for free......" members and poultry groups. I didn't realise how varied 20kg bags could be. Some were very wide and I may need to sew them on the sewing machine to keep a consistent width when building the walls |
 |
| I needed to find a way to fill the bags when on my own. A simple clamp on the back of the trolley did the trick. I did find that without a wood backing on the trolley the bag tended to slump through the trolley bars. After ramming the first couple of buckets I was able to remove the trolley clamp and only use a clamp on the bag and bucket. |
 |
| The mixing took all 5 buckets of earth and about 5-6 litres of water to reach the right consistency. The rammer was made for me by a fellow "Freecycle" member about 12 months when I was considering using tyres. I decided tyres were way to labour intensive and embraced the earthbag method instead. |
 |
| The first earthbag. It will be checked in about 2 weeks to see how well the soil mix set. It hasn't been protected from the elements or the trespassing cattle ...so let's hope it is still intact when I get back out there |
Step 2. Build something small ( to come)
Sunday, October 30, 2011
Thanks
Thank you

Thursday, October 6, 2011
More Pixie Beanies
More Pixie Beanies
These are made with Merino Cross wool and have a lovely wooly look and feel.
If you are after a Pixie Beanie or a hat check out My Market Place for October.
Yes the Beanies made for Felt United are forsale.
The ones on this page are forsale as well at the same price.


Wednesday, October 5, 2011
How to Felt Wire....My Version.

I first got the idea for making headbands and hair ties for fund raising events during the felting camp at the Jondaryan Woolshed in Oct last year. Wendy Bailey had some very pretty hair ties with large felt flowers felted onto foam curlers. I had dismissed the idea as the ties appeared a little bulky for children's pony tails.
A few months later Abbie Vievers was visiting and over a cup of coffee I listened while she brain stormed ideas for an Open Day at the Serendipity Farm Animal Centre on October 22. I then remembered Wendy's pretty ties and thought they would be great for a felt demonstration and as a fund raiser. The bulkiness of the tie, and the time needed to make the flower, was a concern. I needed to simplify the process. Once again it was put on the back burner .....until I read an article in the 5th Issue of Felt Magazine by Anita Larkin "Felting around wire..Fungi Bracelet". She used Corriedale wool which gave it a rustic look. I became excited when I found I had all the materials at hand .....recycled fly screen tubing from old screen doors, wire from repairing the fence and of course various types of wool.
I found Anita's process, while effective was awkward, and I needed to be simplify it if children were to felt wire on Open Day. I also needed to find a decoration that could be made quickly and still be as appealing as Wendy's flowers. I found the solution in Christine White's Uniquely Felt ..."Bodacious Bamboo" page 49.
So here is my version for felting around wire:
I decided that bracelets would be something quick and easy for the girls to make and snakes and lizards for the boys. I wrapped the ridged fly screen tube (spline) around my wrist and let the ends overlap about an inch. This should be a good length for the children's bracelets, hair ties and little snakes and lizards.
The tubing can be found at hardware stores for about 60c metre or a little cheaper in packs of about 13 metres. I used galvanised wire from my tool box. You can see the wire size in relation to the tube in the photo.


You will notice that the wire has a curve (a memory) which persists through out the process. This can be used to advantage. First the wire was bent back onto the topside of the curve to reduce the risk of scratching when worn. The wire was stroked along the length when shaping to avoid kinks. However any shaping was avoided until finished.

Using a template: I used exactly the same process as I do when felting hats, bags etc. I cut a piece of lino (floor vinyl) one and a half times the length of the tube and about inch wide, to use as a template. Fine Merino tops were laid across the template and a thin layer down the length. It was then dampened down and felted with netting over the top till I was able to turn it over.
The sides were folded in and tops were laid on the second side. At times I found very little wool was needed on the second side as the folded sides often cover the side quite well. I did need to do a full layer on the one in this photo though. When it felted well and straining at the edges..... the ends were cut and the template pulled out. To pull template out the felt tube was pushed down like a sock part way and then grabbed at the bottom and pulled off. The tube is very fragile at this stage so go slow.

Covering the ends: Next some wool was hooked in the wire ends and pliers used to fix it firmly. Here my method varies again from Anita's. The wool is held between finger and thumb and the wire twirled so the wool winds around the tube and wire like a "cotton bud". This gives a good cover over the wire end. When both ends were covered the wire tube was pushed into in the felted tube. The ends of the felt tube were pulled over the first "cotton bud".

To felt the tube: Wet the end thoroughly with soapy water and gently rub the felt ends together. As it starts to felt together the end can be rolled on a wet towel or between the palms. When the end has felted onto the wool that was twirled around the wire ... push the felt tube up the wire and repeat the process on the second end.

Felt both ends well before felting the middle. To start the process roll the wire felt between the palms as if washing you hands. Move the folds up and down as you felt to avoid them felting onto themselves. The folds will shrink and disappear as you roll.

Last stages of rolling. Rolling on a wet towel helps in speed up the final process. Putting it into hot water and then using a mallet as Anita suggests to shock the felt is also an option.
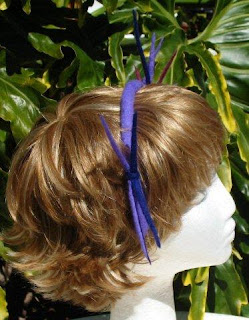
The wire felt finished ready for decoration. I found this basic method quite quick and perfect for children on Open Day


Saturday, September 17, 2011
Felting with Wire
I've been working on some ideas for Serendipity Farm Animal Rescue's Open Day in October. I hope have some wire felted head bands and bracelets to put toward the fund raising effort, as well as demonstrating my wire felting method on the day. I have adapted the process and ideas of 3 other felters and will post my own "how to" version at a later date.
To learn more about Serentipity go to the link at the top right hand side of this blog. Please come and support the efforts of this lovely family in caring for unwanted animals. Many of their animals were lost when a wall of water hit the Lockyer valley in January 2011 and they are working hard to rebuild pens and fences, as well as feed newly rescued animals. I will post more information about the Open Day as it comes ......or you might like to follow Serendipity on Facebook.
Below is the first wire felt.


Red Beret and Blue Pixie Beanie

Although have made many felt hats I have never had any success with berets. Most were too thick and heavy, or the head opening was too large and fell over my eyes. Often they were recycled into bags and bowls or cut up and used in some other way. This time I only used 2 thin layers of merino cross tops and made this little red beret. At last something that might work. I'm already thinking about how I can improve the process.

The little Red Beret will join this Blue Pixie Beanie on International Felt Day.
For the blue beanie I used a mix of fine Merino and a blended Cross Merino. Each beanie takes on its own unique character and I have found that each can change again and again by simply wetting and re-folding. Lots of fun and very functional.


Subscribe to:
Posts (Atom)